
TL;DR
A closet rig can be surprisingly quiet when you focus on sealing gaps, proper placement, and ventilation. Foam alone doesn’t soundproof — it’s about combining absorption, barriers, and airflow for best results.
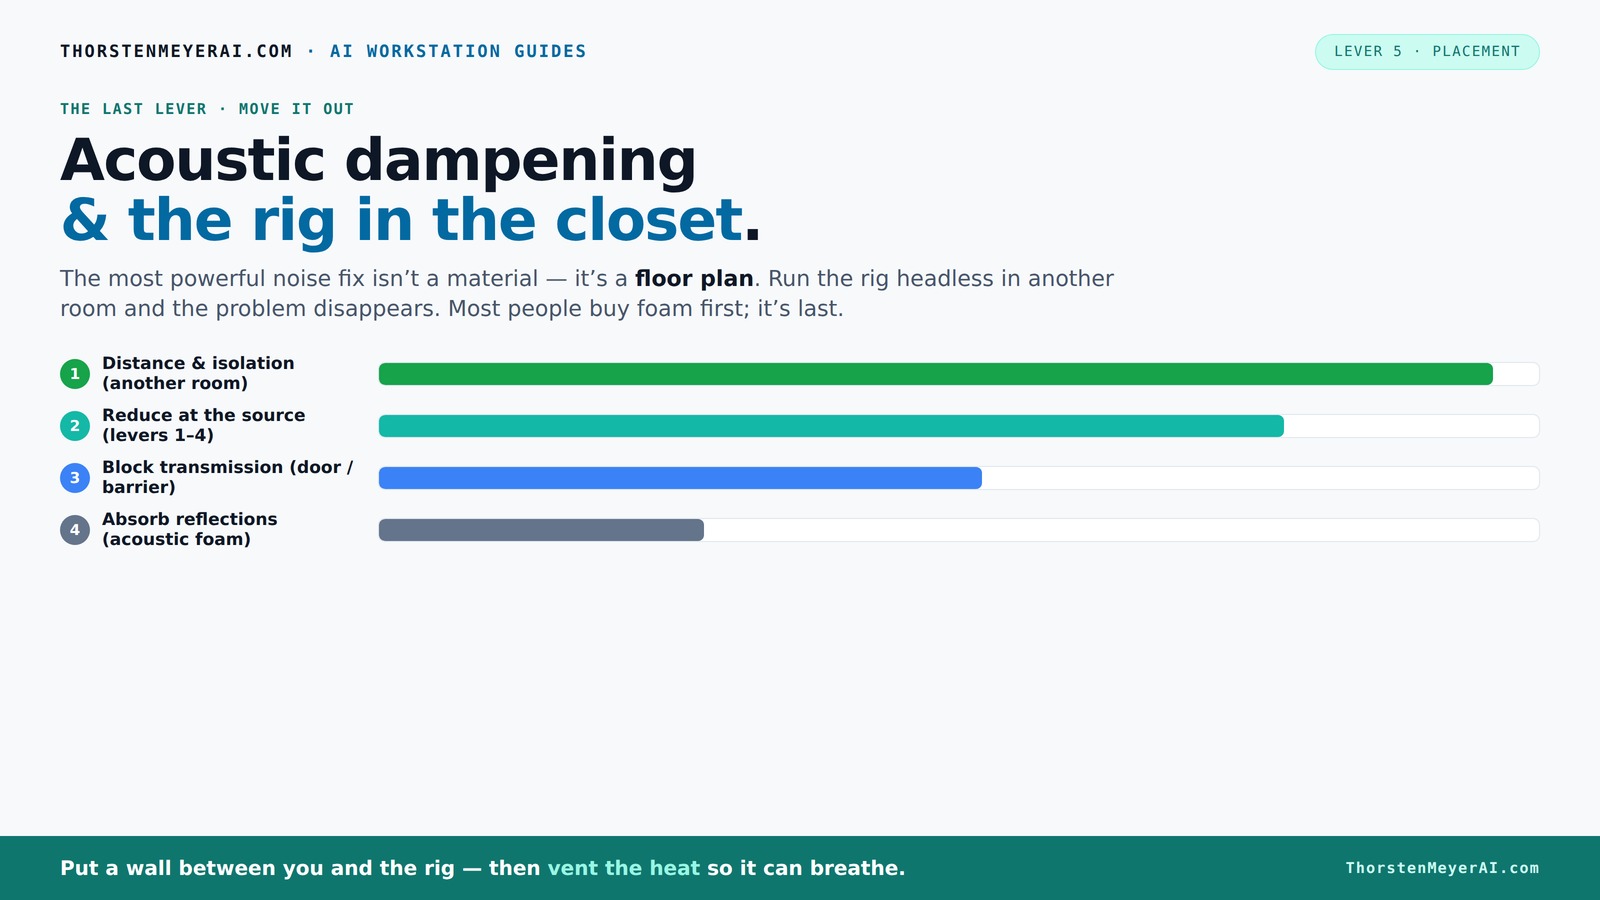
Acoustic dampening
& the rig in the closet.
The most powerful noise fix isn’t a material — it’s a floor plan. A rig you can’t hear because it’s in another room beats any amount of foam. Tap the approaches in Part 1 to see what actually works.
(another room)
(levers 1–4)
(door / barrier)
(acoustic foam)
Contain the noise, not the heat
Key Takeaways
- Sealing gaps and cracks is the most effective first step in reducing noise from a closet rig.
- Foam absorbs reflections but doesn’t block sound; barriers and mass are needed for true soundproofing.
- Placement of panels at reflection points and in corners dramatically improves sound quality.
- A closet rig works best for voice, streaming, and scratch recordings—not loud instruments or band tracking.
- Ventilation is crucial—sealed spaces trap heat and can damage your hardware if not properly cooled.

Focusound 52 Pack Acoustic Foam Panels 1" x 12" x 12" Sound Proof Foam Panles Soundproofing Noise Cancelling Wedge Panels for Home Office Recoding Studio with 300PCS Double-Side Adhesive
Soundproofing - Acoustic foam panels triangular grooves structure for better noise absorption, helps to reduce and absorb unwanted...
As an affiliate, we earn on qualifying purchases.
As an affiliate, we earn on qualifying purchases.
Why Foam Alone Won't Silence Your Closet (And What Will)
Foam panels are great at absorbing echoes and reducing harsh reflections inside a closet. But they don’t stop sound from escaping or entering. Think of foam as softening the room’s echoes, not blocking the sound from leaking out. If your goal is to silence noise, you need a different approach.
For example, a foam panel on the wall behind your mic will cut down on reflections bouncing back into your mic. But it won’t stop your neighbor’s loud lawnmower or the street noise from sneaking in through gaps and thin walls.
The best way to reduce noise is to focus on sealing gaps, adding mass, and placing your rig away from your workspace. Foam is just one piece of the puzzle.
Understanding this distinction is crucial because many assume foam is a catch-all solution. In reality, the limitations of foam mean you need supplementary strategies—like sealing and barriers—that address the actual paths sound takes to escape or enter your space. Without these, the noise will still leak, defeating the purpose of your setup.

8 Pack - Bass Traps Acoustic Foam Corner, 8''x8''x12'' Black Bass Traps Corner Studio Foam, High Density and Fire-Proof Acoustic Panels Recording Studio Acoustical Treatments
Acoustic Principle- Bass Trap is a kind of sound absorbing structure specially used to absorb specific low-frequency standing...
As an affiliate, we earn on qualifying purchases.
As an affiliate, we earn on qualifying purchases.
Seal Every Leak First — Gaps, Doors, and Cracks Matter Most
The biggest weak points in any closet are gaps—around doors, vents, or wall openings. These are the holes sound sneaks through. Sealing them is the fastest, cheapest, and most effective way to cut noise.
Use weatherstripping around the door, acoustic sealant in cracks, and maybe a draft stopper at the bottom. Even a simple door sweep can make a huge difference.
Imagine trying to whisper in a room with the door slightly ajar. That’s what happens when gaps aren’t sealed. Tightening those leaks can reduce outside noise by 50% or more.
Why does this matter? Because even the best foam treatment won’t help if sound can bypass your barriers through unsealed gaps. Sealing reduces the pathways for sound to travel, which is especially important in small, thin-walled spaces like closets. The tradeoff here is that meticulous sealing requires effort but yields significant improvements in noise isolation, often more than adding foam or absorption materials alone.
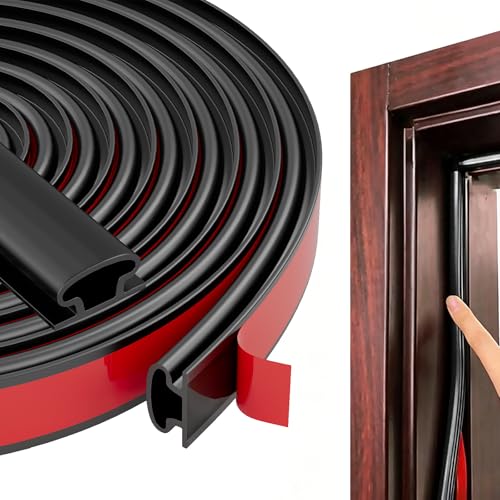
Black Rubber Weather Stripping Door Seal Strip, D Shape Door Weather Seal Strip, Self-Adhesive Soundproofing Frame Insulation Tape for Doors Frame/Window Seal,Blocks Cold Drafts Noise
【THICKENED SILICONE MATERIAL - COMPLETELY BARRIERING AIR AND NOISE】:The weather stripping is made of thickened TPE material with...
As an affiliate, we earn on qualifying purchases.
As an affiliate, we earn on qualifying purchases.
Placement Tricks: Where to Put Absorbers for the Best Results
Placement is everything when it comes to acoustic treatment in a small closet. The goal: target the spots where reflections bounce back into your microphone.
Start with the wall behind your mic—this is your primary reflection point. Use a small panel or foam at ear level. Then, treat the side walls where sound waves might bounce sideways. The ceiling is often overlooked but can be crucial in tiny spaces.
For bass issues, add trap-like panels in the upper corners. These low-frequency problems are common in small closets because of parallel walls trapping sound waves.
Proper placement isn’t just about sticking panels randomly; it’s about understanding how sound reflects within your space. Placing absorption at the primary reflection points reduces comb filtering and echoes, resulting in a clearer, more natural sound. In tight spaces, the tradeoff is that over-treating can make the room sound dead, so balance is key.
Here’s a quick placement checklist:
- Behind the microphone
- Side reflection points
- Ceiling above the mic
- Corners for bass trapping

2 Pack Studio Monitor Isolation Pads for Speakers 3-5 Inches Sound Insulation Studio Foam Prevents Vibrations Acoustic Speaker Isolation Pad High Density Fits Most Stands
Enhanced Sound Clarity: Saiqiang speaker isolation pads can reduce vibrations and resonance, providing cleaner, more accurate sound from...
As an affiliate, we earn on qualifying purchases.
As an affiliate, we earn on qualifying purchases.
The “Rig in the Closet” Setup — How to Keep It Cool and Quiet
Putting your rig in a closet sounds perfect—quiet, out of sight, out of mind. But the big catch: heat. A high-power AI rig can generate over 600W of heat, and sealing it in a closet traps that heat, making the machine overheat.
To avoid cooking your hardware, you need ventilation. Passive vents help, but active exhaust fans are better. They pull hot air out and bring in cooler air, preventing temperature spikes.
For a sealed yet cool setup, consider a purpose-built soundproof cabinet with ducted airflow and temperature controls. These units can reduce noise up to 36 dB while keeping your hardware happy. Check out this guide for detailed cooling solutions.
Why does this matter? Because overheating can cause hardware throttling, reducing performance and potentially damaging components. Ventilation strategies involve tradeoffs: adding ducting or fans might introduce noise, but proper design minimizes this. The key is balancing soundproofing with effective airflow. Without good ventilation, your rig risks overheating, which can negate the benefits of a quiet space and cause costly hardware issues.
How to Deal with Low-Frequency Buildup in Small Closets
Low-end bass can turn a tiny closet into a rumbly mess. Sound waves bounce around in small, parallel spaces, creating standing waves and boomy spots. Bass traps are the fix—placed in upper corners or along parallel walls.
In a typical closet, 2-inch thick bass traps at the corners can cut down on muddiness. For larger or more problematic rooms, 4-inch traps are better. But even in tiny spaces, a few strategically placed panels make a difference.
Understanding how bass behaves in small rooms is crucial. Low frequencies have longer wavelengths and tend to build up where surfaces are parallel and enclosed, causing boomy, muddy sound. Effective bass trapping involves placing panels in these key areas to absorb these resonances. The tradeoff is that bass trapping can be expensive and takes up space, but neglecting it often results in a dull or boomy sound that can’t be fixed with just absorption at higher frequencies.
Don’t forget: if you notice persistent bass issues, check for parallel surfaces and consider adding a portable bass trap or moving the rig slightly to break up standing waves.
Do Soft Surfaces Help? What About Rugs, Blankets, and Clothing
Soft surfaces like rugs, blankets, and clothing absorb high frequencies and reduce harshness inside your closet. They make your recordings sound smoother and less echoey.
But don’t expect them to block noise transmission or vibrational hums. If footfalls or structural noise are a problem, soft fabrics won’t help much.
Use soft materials as a finishing touch—cover hard surfaces, line shelves, or hang blankets over reflective spots. For actual isolation, focus on sealing, barriers, and decoupling. The tradeoff here is that soft surfaces improve the sound quality inside your space but don’t significantly reduce external noise intrusion. They’re best used as a complement to more effective sealing and barrier methods.
What’s the Best Way to Use a Closet as a Recording Space?
The best way: treat it as a controlled reflection zone, not a soundproof chamber. Seal gaps, place absorption at reflection points, and add soft surfaces. Keep the door closed to contain reflections, but don’t expect total isolation.
Remember: a closet is perfect for voice, podcasts, and scratch vocals. It’s less suited for loud instruments or full-band recordings unless you’re willing to invest heavily in ventilation and barriers.
If you want a quick upgrade, start with a few panels, seal the door, and add a soft blanket or two. For serious work, consider a purpose-built vocal booth or an acoustic enclosure.
Understanding the limitations is key. A closet can improve the sound quality significantly, but it’s not a substitute for a dedicated studio space. The tradeoff is convenience versus optimal acoustic control, so set realistic expectations accordingly.